

 English
 España

How to Charge and Clean a Cordless Hand Mixer: Tips from the Manufacturer
 2026.11.06
 News
How do you charge and clean a cordless hand mixer? It is one of the first questions people ask when they switch from a traditional corded model. A cordless mixer gives you total freedom to move around the kitchen, but that convenience comes with a new set of care routines. Charging the battery properly and cleaning the detachable parts correctly are the two things that decide whether your mixer lasts for years or starts failing within months.
At BLMEAS, we have been designing and manufacturing battery-powered kitchen appliances for over a decade. We build cordless hand mixers that are meant for daily use, and we also learn a great deal from the feedback our customers send us. Based on that experience, we have put together a straightforward guide that covers both charging and cleaning, along with a few tips that manufacturers rarely talk about.
Anatomy of a Cordless Hand Mixer
To understand how to care for a cordless hand mixer, it helps to look at what is inside. The main body houses a small electric motor, a lithium-ion battery, and the control buttons. The motor connects to two sockets at the bottom of the body. These sockets hold the removable attachments: wire beaters for whipping cream, eggs, and light mixtures, and optionally dough hooks for heavier dough.
This two-part design is the reason cleaning rules are so specific. The attachments are made of stainless steel or coated wire and can tolerate water. The main body, however, contains electronic parts that must stay dry. Even if a mixer is advertised as splash-proof, submerging the body can push water into the battery compartment and cause short circuits or corrosion.
Once you accept this basic division, charging and cleaning become much easier. You only need to learn the right routine for each part.
How to Charge a Cordless Hand Mixer
Charging a cordless hand mixer is almost identical to charging a smartphone. Most current models, including those from BLMEAS, use a USB cable that connects to the base or lower part of the handle. Follow these steps for a safe and efficient charge.
- Turn the mixer off. Charging while the motor is running is not possible, and it is also a bad habit that can damage the switch.
- Inspect the charging port. Make sure it is clean and completely dry before inserting the cable. Wipe away any dust with a soft dry cloth or a cotton swab.
- Connect the supplied cable to the mixer, then plug the other end into a USB power adapter. The adapter should match the voltage listed on the mixer label, typically 5V, which is the standard for most USB chargers.
- Watch the indicator light. A red or orange light usually means charging is in progress. Some models use a flashing light to show the battery level. When the light turns green or stops flashing, the battery is full.
- Remove the cable as soon as charging is complete. Leaving the mixer connected for hours after a full charge is not necessary and can gradually reduce battery performance.
You can see this simple charging setup in our cordless hand mixer with a 3.7V battery. The charging port is located on the back of the handle, and the included cable works with any standard USB source.
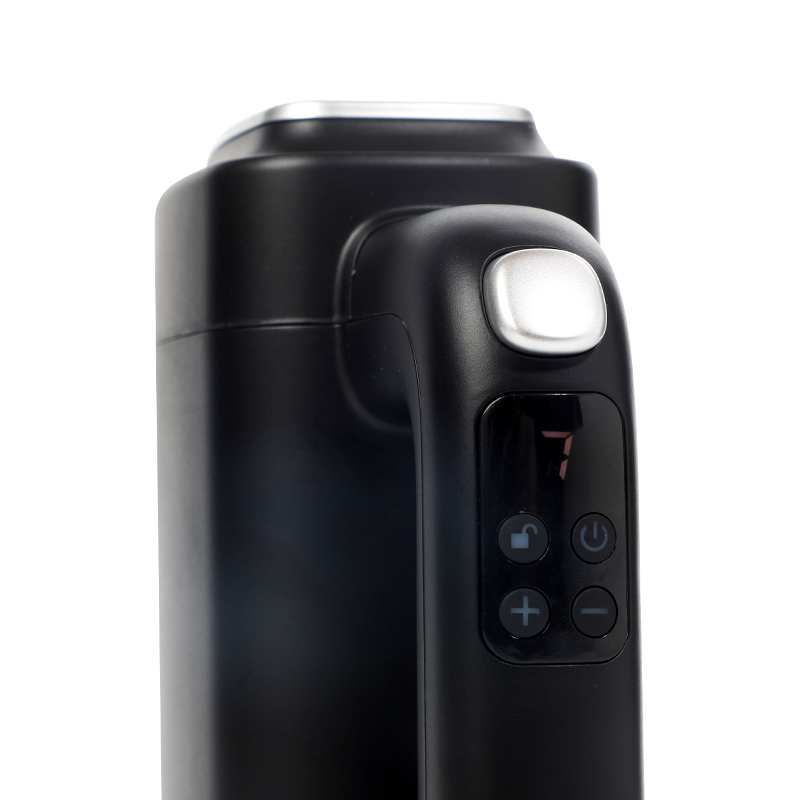
How long does a full charge take? Most cordless hand mixers need two to three hours. The runtime afterward depends on the workload, but mixing cake batter or whipping cream for a few minutes is well within the capacity of a single charge. If you notice that the mixer slows down quickly, the battery may be aging, which is normal after several years of use.
There are also a few charging habits that protect the battery in the long run. Try not to let the mixer drain to zero every time. Lithium-ion batteries last longer when you recharge them when about 20–30% capacity remains. Also, avoid charging in very hot or very cold places, such as directly above a stove or near a sunny window.
How to Clean a Cordless Hand Mixer
Cleaning a cordless hand mixer is not difficult, but it does require following one firm rule: keep the motor body away from water. Below, we break cleaning into two separate routines.
Cleaning the Attachments
- Unplug the mixer and remove the beaters or dough hooks. Pull them straight out from the sockets; there is no need to twist.
- Rinse the attachments under warm running water right after use. This removes most of the food residue before it dries and becomes harder to clean.
- Wash each attachment with warm soapy water and a soft sponge. Some models have a nonstick coating, so avoid abrasive pads that can scratch the surface.
- If the mixer has a dishwasher-safe symbol in the manual, you can place the attachments on the top rack of your dishwasher. The lower rack exposes them to stronger jets and higher heat, which may cause wear over time.
- For baked-on batter or sticky dried residue, fill a bowl with warm water and a drop of dish soap, then soak the attachments for ten to fifteen minutes. After soaking, scrub gently with a soft brush.
- Rinse everything thoroughly and dry it with a clean towel. This final step matters more than people expect. When wet attachments are stored in a drawer, moisture can promote rust even on stainless steel.
Cleaning the Main Body
The main body should never be immersed in water, nor should you rinse it under a tap. Instead, wipe the body with a soft cloth that has been slightly dampened with water or a dilute soap solution. Wring the cloth well so it is not dripping. Pay attention to the seams and the area around the buttons, where grease and batter can collect.
For narrow gaps around the button panel, use a cotton swab or a soft toothbrush. You can dip the swab in rubbing alcohol and squeeze out the excess. This helps dissolve sticky residue without leaving moisture behind. After wiping, go over the surfaces again with a dry cloth.
One area that is easy to miss is the underside of the mixer, including the sockets where the attachments connect. Food splash often lands there. A dry cotton swab is usually enough to clean those sockets. If they are greasy, dip the swab in a little vinegar, then dry the sockets thoroughly.
When you have finished cleaning, let the mixer air dry for at least half an hour before reconnecting the charger or putting it back in a cabinet. This allows any residual moisture around the charging port to evaporate.
What to Avoid
- Never use steel wool or metal scouring pads on any part of the mixer.
- Never place the main body in a dishwasher or leave it soaking in a sink.
- Avoid spraying kitchen cleaner directly onto the body; spray the cloth instead.
- Do not clean the charging port with a wet cotton swab.
Everyday Maintenance and Storage
A few minutes of care after each use will keep your cordless hand mixer in good shape for years. Here is what we recommend to customers who ask how to make their mixer last longer.
- Store the mixer with the attachments removed. Keeping them attached can put constant pressure on the socket joints and make the mixer slightly unbalanced in a drawer.
- Keep the handle's charging port covered. Many mixers come with a small silicone cover; if yours has one, use it. If not, store the mixer handle facing upward so dust does not settle inside the port.
- Check the attachments from time to time. Bent wires on a beater can scrape the sides of your bowl and put extra load on the motor. When you notice a changing shape, replace the attachments.
- Clean the mixer body after every few uses, even if it looks clean. Tiny droplets of oil and batter settle on the surface and gradually become sticky.
- If you plan to leave the mixer unused for more than a month, charge the battery to about 50% before storing it. A completely drained lithium-ion battery can slip into a low-voltage state and refuse to charge later.
Our designers think carefully about these everyday details. You can see the approach across our cordless hand mixer collection, which includes models that are compact enough for small kitchens while still delivering enough power for regular baking tasks.
Common Charging and Cleaning Questions
During our years of manufacturing kitchen appliances, we have collected recurring questions from users. Here are the answers we usually give.
| Question | Answer |
|---|---|
| Can I wash the whole mixer under running water? | No, only the detachable beaters and hooks can touch water. |
| How long does a full charge take? | Two to three hours is typical for cordless hand mixers. |
| Can I use my phone charger to charge the mixer? | Yes, if the charger outputs the same voltage listed on the mixer label. |
| Is it okay to put the beaters in the dishwasher? | Check the manual; if dishwasher-safe is marked, place them on the top rack. |
| What should I do if the mixer slows down after cleaning? | Let it dry completely and check that the attachments are inserted firmly. |
| How can I remove the smell of garlic from the beaters? | Wash them with lemon juice or a baking soda solution, then rinse and dry. |
| What is the best way to clean the charging port? | Use a dry cotton swab or a soft brush; never use liquid. |
| Can I charge the mixer immediately after washing it? | Wait until the body and port are completely dry, at least thirty minutes. |
Charging and cleaning a cordless hand mixer really comes down to two habits: charge the battery before it runs flat and wipe the motor body instead of soaking it. Wash the beaters after every use, dry them properly, and store the mixer with the attachments off. These simple actions protect the motor, the battery, and the food that touches the beaters.
We have spent years helping customers make the most of battery-powered kitchen tools, and we still believe that a cordless hand mixer is one of the most convenient helpers you can own. When you take care of it properly, you will find yourself reaching for it almost every day. That is exactly why we put so much thought into the charging and cleaning experience of every mixer we make.
PREV: How Long Does a Cordless Hand Mixer Battery Last? A Manufacturer’s Guide
NEXT:It is the last article
NEXT:It is the last article
 SEE more
 SEE more
 SEE more
 SEE more
 SEE more
 SEE more
 SEE more
 SEE more
 SEE more
 SEE more
 SEE more
 SEE more
 SEE more
 Leave a message
Copyright © Ningbo Longde Life Electric Appliance Co., Ltd.  Wholesale Portable Kitchen Appliance For Outdoor Use Manufacturers